Some cookies are trendy. Some cookies are timeless. And some cookies manage to be both at once — classics that have been baked by families for generations and are now finding a whole new audience in 2026 because, it turns out, the things that made them wonderful have never stopped being true. Thumbprint cookies are exactly that kind of cookie.
Buttery, delicate, filled with a jewel-bright center of jam, Nutella, lemon curd, or salted caramel — thumbprint cookies are one of the most beginner-friendly, kid-friendly, endlessly customizable cookies in the entire family baking canon. They require no special equipment, no advanced technique, and no ingredients beyond what most families already have in their pantry. And that small, satisfying act of pressing a thumb into a round of dough — which gives the cookie both its name and its signature appearance — is one of the most universally beloved baking steps for children of every age.
At Mommy and Me Cookies, we love a recipe that comes with history, warmth, and joy built right in. Thumbprint cookies deliver all three. And in 2026, as Food & Hotel Asia’s 2026 bakery trend report highlights, nostalgic classics updated with modern fillings and contemporary twists are among the fastest-growing categories in home baking — and thumbprint cookies are one of the most perfect expressions of that trend.
The Wonderful History Behind the Thumbprint Cookie
Before we bake, let us take a moment to appreciate where these charming cookies come from — because thumbprint cookies have a genuinely beautiful backstory that makes them even more special to bake and share with your family.
Born in Sweden as a Raspberry Cave
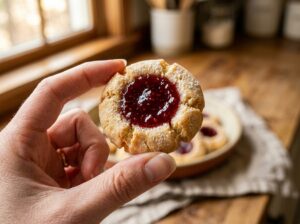
The thumbprint cookie has its roots in 19th-century Sweden, where it is known as hallongrotta — a word that translates literally to “raspberry cave” in Swedish. As 196 Flavors’ guide to hallongrotta explains, these cookies originated in Sweden in the 1800s and were traditionally served at kafferep — the formal Swedish women’s coffee gatherings that were the cultural ancestor of the beloved fika tradition. Seven types of cookies were expected at a proper kafferep: too few was considered stingy, too many was showing off. The hallongrotta — with its buttery shortbread base and jewel of raspberry jam at the center — was one of the most cherished of the seven.
The cookie spread throughout Scandinavia and eventually to Germany — where it is known as Engelsaugen, meaning “angel’s eyes,” a name that perfectly captures the appearance of the jam center — and eventually to the United States, where the “thumbprint” name stuck because of the technique used to make the indentation. Today, the cookie is beloved worldwide in dozens of variations, but its soul remains unchanged: a simple, buttery dough, a small pressed well, and a sweet filling that glows like a gemstone in the center.
Why It Is the Perfect Family Baking Cookie
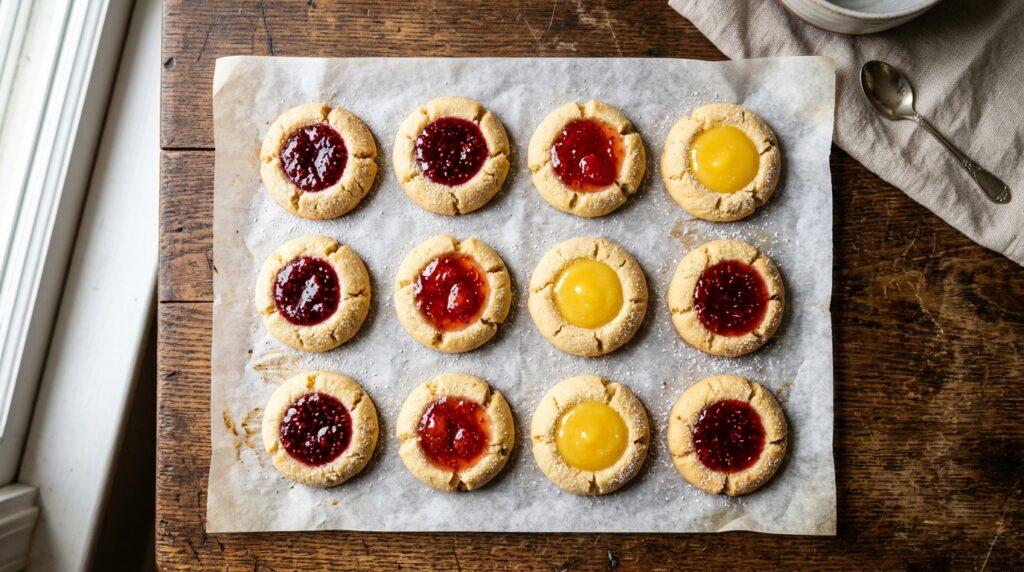
The thumbprint cookie has endured for over two centuries for exactly the same reasons it is perfect for family baking today. It requires no rolling pin, no cutter, and no piping bag. It is made with a handful of pantry staples. The technique — rolling dough into balls, pressing a thumb into each one, filling the well with something sweet — is completely manageable for children from age three upward. And the result looks genuinely beautiful: a tray of thumbprint cookies, each one glistening with a different colored filling, has a visual impact that makes even the simplest batch look bakery-worthy.
The Classic Thumbprint Cookie Recipe
This is the foundational recipe — a traditional Swedish-style buttery shortbread base that is tender, slightly crumbly, and deeply buttery, with a mild sweetness that works beautifully as a neutral canvas for any filling you choose. It uses powdered sugar rather than granulated sugar — a key distinction that gives the dough its characteristic melt-in-the-mouth texture.
Ingredients (Makes 24 to 28 cookies)
- 1 cup (225g) unsalted butter, softened to room temperature
- ½ cup (60g) powdered sugar, sifted
- 1 teaspoon pure vanilla extract
- ¼ teaspoon fine sea salt
- 2 cups (260g) all-purpose flour
- Your choice of filling — approximately ½ cup total (see filling options below)
Optional Additions for Extra Texture
- ½ cup (50g) finely chopped walnuts, pecans, or pistachios — for rolling before baking
- 1 egg white, lightly beaten — to help the nuts adhere to the dough
Step 1 — Make the Dough
Beat the softened butter with the powdered sugar in a large bowl until light, fluffy, and pale — about 3 minutes with a hand mixer or 4 to 5 minutes by hand. Add the vanilla and salt and mix until combined. Add the flour in two additions, mixing on low speed just until the dough comes together into a soft, smooth ball. The dough should not be sticky — if it is, add flour one tablespoon at a time until it holds its shape cleanly. Cover the bowl and refrigerate for 30 minutes. Chilling firms the butter and prevents the cookies from spreading too much during baking, which is essential for maintaining the shape of the indentation.
Step 2 — Shape and Press
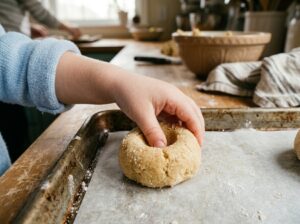
Preheat your oven to 350°F (175°C) and line two baking sheets with parchment paper. Roll the chilled dough into balls approximately 1 inch in diameter — about 1 tablespoon of dough each. If using the nut coating, dip each ball first in the beaten egg white and then roll in the finely chopped nuts before placing on the baking sheet. Place the balls about 1½ inches apart — these cookies do not spread significantly.
Now the best part: use your thumb — or the rounded end of a wooden spoon handle for a more perfectly round indentation — to press firmly into the center of each dough ball, creating a well about ½ inch deep. Press gently but decisively, without cracking the edges of the dough. If the edges crack, simply smooth them back together with your fingertip. This is the moment every child in the kitchen has been waiting for. Hand each little helper their own row of dough balls and let them press their own thumbs into each one. The wells do not need to be uniform or identical — they just need to hold filling, and every size and shape will achieve that beautifully.
Step 3 — Add the Filling
Fill each indentation with approximately ¼ teaspoon of your chosen filling. Do not overfill — the filling expands slightly during baking, and an overfilled cookie will bubble over the edges and lose its neat appearance. A small spoon or a piping bag (or a zip-lock bag with one corner snipped) gives the most control and keeps the process clean and fun for little helpers.
Step 4 — Bake and Cool
Bake for 12 to 14 minutes until the cookies are just beginning to turn golden at the base — the tops should remain pale and the filling should look set but still slightly glossy. Do not overbake. Thumbprint cookies continue to firm up as they cool, and pulling them at the right moment ensures that characteristic melt-in-the-mouth shortbread texture rather than a dry, crumbly result. If any of the indentations have puffed up during baking, use the back of a small spoon to gently re-press the center while the cookies are still warm. Cool completely on the baking sheet before transferring. For more guidance on common cookie texture and spread issues, our cookie troubleshooting guide has every scenario covered with easy fixes.
The Best Fillings for Thumbprint Cookies in 2026
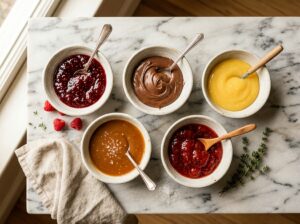
The traditional filling is raspberry jam — and it remains the most beloved for excellent reasons. The bright tartness of raspberry against the rich, buttery shortbread is one of the great flavor contrasts in all of cookie baking. But the modern thumbprint cookie has expanded far beyond a single jam, and exploring new fillings is one of the most enjoyable ways to make this classic recipe feel fresh and personal to your family.
Classic Jam and Preserves
Any fruit jam, jelly, or preserve works beautifully in a thumbprint cookie. Raspberry is traditional and always wonderful. Strawberry is sweeter and gentler, particularly popular with young children. Apricot jam bakes to a beautiful amber color and has a sophisticated, slightly tangy flavor that pairs beautifully with the buttery dough. Blueberry, cherry, and blackcurrant all work exceptionally well. For best results, use a thick jam or preserve rather than a runny jelly — thick jam holds its shape in the well during baking, while a very liquid jelly can spread across the cookie surface. Warm the jam briefly in the microwave if it is very firm, then let it cool slightly before filling to keep it manageable and prevent burning.
Nutella and Chocolate Hazelnut
Nutella-filled thumbprint cookies are among the most popular modern variations — particularly with children who find the chocolate-hazelnut flavor completely irresistible. Because Nutella softens significantly during baking, it works best when added after the cookies come out of the oven, pressed into the warm indentation while the cookie is still slightly hot. This keeps the Nutella glossy, gooey, and perfectly distinct from the cookie. For families who have already discovered the magic of Nutella as a cookie filling, our post on stuffed cookies covers even more ways to use it in family baking.
Lemon Curd
Lemon curd thumbprint cookies are bright, citrusy, and genuinely sophisticated — the tart, creamy curd against the buttery shortbread is one of the most elegant flavor combinations you can produce from a beginner recipe. Add a small amount of lemon zest to the cookie dough itself to amplify the citrus theme throughout. Lemon curd thumbprints are particularly popular for spring and summer baking and make a beautiful addition to any brunch, baby shower, or Mother’s Day spread.
Salted Caramel
Salted caramel thumbprint cookies are the most indulgent variation on this list — thick, rich caramel filling against the buttery shortbread, finished with a tiny pinch of flaky sea salt on top of the caramel after baking. Use a thick, store-bought or homemade caramel sauce rather than a pourable caramel — the thicker the caramel, the better it holds in the well. Add the caramel after baking, when the cookies are still warm, for the cleanest result.
Cream Cheese and Fruit
For a cheesecake-inspired variation, fill each well with a small amount of sweetened cream cheese — 4 ounces beaten with 2 tablespoons of powdered sugar and ½ teaspoon of vanilla — and top with a single fresh or freeze-dried berry pressed into the center before baking. The cream cheese sets during baking into a smooth, tangy filling that is genuinely extraordinary and visually beautiful.
Four Fun Thumbprint Cookie Variations to Try
Chocolate Dough Thumbprints
Replace 3 tablespoons of the flour with 3 tablespoons of Dutch-process cocoa powder for a deeply chocolatey base dough. Fill with raspberry jam for a chocolate-raspberry combination that is truly spectacular, or with a white chocolate ganache for maximum visual contrast — dark cookie, white filling, beautiful.
Coconut-Rolled Thumbprints
Roll each dough ball in toasted shredded coconut instead of chopped nuts for a tropical variation with a beautiful texture and a subtle coconut flavor that pairs wonderfully with mango jam, pineapple preserves, or a passion fruit curd filling.
Sprinkle Thumbprints
For a birthday-party version that children adore, roll each dough ball in rainbow sprinkles before pressing and baking. The sprinkles toast slightly in the oven, adding a gentle crunch and a festive visual that makes every tray of these cookies look like a celebration. Fill with any jam, Nutella, or frosting for a completely irresistible party cookie. For more creative decorating ideas, our post on creative cookie decorating ideas for kids has plenty of inspiration.
Matcha Thumbprints With Strawberry Jam
Add 1½ tablespoons of culinary-grade matcha powder to the dough for a beautiful pale green cookie that tastes earthy, slightly bitter, and deeply complex. Fill with bright strawberry jam for a red-on-green color combination that is absolutely stunning — a modern, globally-inspired twist on the Swedish original that has become one of the most shared thumbprint variations on Pinterest and Instagram in 2025 and 2026.
Tips for Perfect Thumbprint Cookies Every Time
Chill the Dough — Do Not Skip It
The 30-minute chill is not optional. Room-temperature shortbread dough is too soft to hold a clean indentation during baking — it will fill in and lose its well. Chilled dough holds the thumb impression cleanly through the entire bake, producing the neat, defined center that makes thumbprint cookies so visually distinctive. If you are in a hurry, 15 minutes in the freezer achieves the same result.
Do Not Overfill
The most common thumbprint cookie mistake is overfilling the indentation. A generous quarter teaspoon of filling is exactly right — more than that and the filling bubbles over the edge during baking, losing its neat appearance. Err on the side of less, knowing you can always add a small additional drop of filling immediately after baking while the cookies are still warm.
Re-Press While Warm
Even perfectly pressed indentations sometimes puff slightly during baking as the dough expands. The moment the cookies come out of the oven, use the back of a round measuring spoon or a small melon baller to gently re-press each well while the dough is still soft and malleable. This takes about 30 seconds and ensures every cookie has a clean, deep center for the filling.
Storing and Gifting Thumbprint Cookies
Thumbprint cookies store beautifully at room temperature in an airtight container for up to 5 days — the jam filling actually helps keep the cookies moist and soft over time. Layer them between sheets of parchment to prevent the jam from sticking to other cookies. They freeze well as baked cookies (without the filling for best results — add fresh jam after thawing) for up to 3 months. For complete storage guidance, see our ultimate cookie storage and freezing guide.
As MasterClass notes in their thumbprint cookie guide, these cookies are among the most popular choices for holiday cookie tins and gift boxes — their jewel-bright centers make them visually stunning in a mixed assortment, and their shortbread base travels and keeps exceptionally well. If you are assembling a cookie gift box, thumbprint cookies in three or four different jam colors create a beautiful, professional-looking result that always makes an impression.
A Cookie That Connects Generations
There is something particularly moving about baking a cookie that has been made by families across Scandinavia, Germany, and the United States for over two hundred years. The hallongrotta that Swedish women pressed together at kafferep gatherings in the 1800s and the thumbprint cookies your children press into at your kitchen counter today are connected by the same simple, joyful act — a thumb, a round of dough, and a spoonful of something sweet at the center.
That continuity is one of the quiet beauties of baking with children. The techniques that travel through generations are usually the simple ones — the ones that require nothing more than good butter, willing hands, and a little patience at the oven. Thumbprint cookies are that kind of recipe. They are the kind of cookie that earns a request for “can we make those again?” — not because they are complicated or impressive, but because they are genuinely, simply, deeply good.
Start with raspberry jam — the traditional choice and still the best introduction to what these cookies can be. Then let your children choose their own filling next time. The Nutella version, the lemon curd version, the salted caramel version — each one is a small adventure. And all of them are delicious.
Happy baking from all of us at Mommy and Me Cookies! 🍪