There is a moment in every home baker’s life when they taste something from a bakery or a friend’s kitchen and think — what is it about that cookie that tastes so much better than mine? The texture might be similar, the ingredients almost identical. But there is a depth of flavor, a warmth, a richness that goes beyond chocolate chips and brown sugar and vanilla. Nine times out of ten, the answer is brown butter.
Brown butter is one of the simplest and most transformative techniques in all of baking. It takes exactly one ingredient — butter — and five to eight minutes of your time, and it rewards you with a flavor that is completely unlike regular melted or softened butter. Toasty, nutty, caramel-like, deeply complex — brown butter turns an already excellent cookie into something that earns genuine gasps. And it is entirely beginner-friendly, entirely kid-friendly, and one of the most satisfying baking discoveries your family will ever make in your kitchen together.
What Is Brown Butter and Why Does It Taste So Different?
Brown butter — known in French as beurre noisette, or “hazelnut butter,” named for the nutty aroma it develops — is simply butter that has been cooked beyond the melting point until its water content evaporates and its milk solids toast to a deep golden-brown. The result is a liquid butter that smells like toasted hazelnuts, warm toffee, and caramelized cream all at once — and tastes even better than it sounds.
The Maillard Reaction — Where the Magic Happens
The flavor transformation in brown butter is driven by the same chemical process responsible for the golden crust on bread, the sear on a steak, and the crackled top of a freshly baked cookie. As America’s Test Kitchen explains in their definitive brown butter guide, when butter is heated, its water evaporates and the milk solids — which contain both amino acids and sugars — undergo the Maillard reaction, creating hundreds of new flavor compounds that taste toasty, nutty, savory, and toffee-like simultaneously. This is the same reaction that gives cookies their golden-brown edges, bread its crust, and roasted nuts their depth — concentrated and intensified in the butter itself before the cookie is even mixed.
The practical result for cookie baking is extraordinary. A cookie made with brown butter tastes as though it has already been elevated by a professional pastry chef — and the only extra step you took was spending five extra minutes at the stove before you started mixing.
How Brown Butter Changes Cookie Texture Too
Beyond flavor, brown butter also affects cookie texture in ways that make the final result noticeably different from a cookie made with standard softened or melted butter. Because brown butter is a liquid fat rather than a solid one, it produces cookies with a slightly denser, chewier structure that many bakers — and most children — actively prefer. The removal of water during the browning process also concentrates the butter’s fat content, which contributes to a richer mouthfeel and a more pronounced golden-brown color both inside and out. These are the cookies that look like they came from a specialty bakery — and now they can come from your kitchen.
How to Brown Butter — A Step-by-Step Guide for Families
Browning butter is genuinely simple. The most important things to know before you start are: use a light-colored pan so you can see the color change as it happens, stay at the stove the entire time because the transition from perfectly browned to burned happens quickly, and pour it out immediately once it reaches the right color — the residual heat from the pan will continue cooking it even after you remove it from the heat.
What You Need
- Unsalted butter — the amount your recipe calls for
- A light-colored stainless steel or enameled saucepan — not a dark non-stick pan, which makes it impossible to see the color of the butter as it changes
- A heatproof bowl to pour the finished brown butter into immediately
- A spatula or spoon for stirring
Step-by-Step Process

Place the butter in your light-colored saucepan over medium heat. As food scientist Christina from Scientifically Sweet explains, the browning is caused by the Maillard reaction between lactose and amino acids from the butter’s milk proteins — and using medium heat gives those reactions time to develop properly without burning. The butter will melt, then foam, then bubble vigorously as the water evaporates. Stir or swirl the pan regularly throughout. After the vigorous bubbling subsides, a second, quieter foam will appear — and this is when you need to watch carefully. The milk solids at the bottom of the pan will begin turning from pale gold to a deep amber-brown. The butter will smell intoxicatingly nutty and fragrant. The moment the solids reach a medium-brown color — think the shade of a toasted hazelnut — immediately pour the entire contents of the pan into your heatproof bowl. Do not leave it in the hot pan. The total time from solid butter to finished brown butter is typically 5 to 8 minutes, depending on the quantity and your stovetop.
Let the brown butter cool to room temperature — or speed this up by placing the bowl in the refrigerator for 15 to 20 minutes — before using it in your cookie dough. Using it too hot will melt your sugar prematurely and affect the dough’s structure.
Kid’s role in this step: Older children (10 and up) can stir the butter under close supervision. Younger children love watching through the glass lid of a pan — they can observe the color transformation and alert you when they see it turning golden. It is a wonderful, low-stakes introduction to the chemistry of cooking.
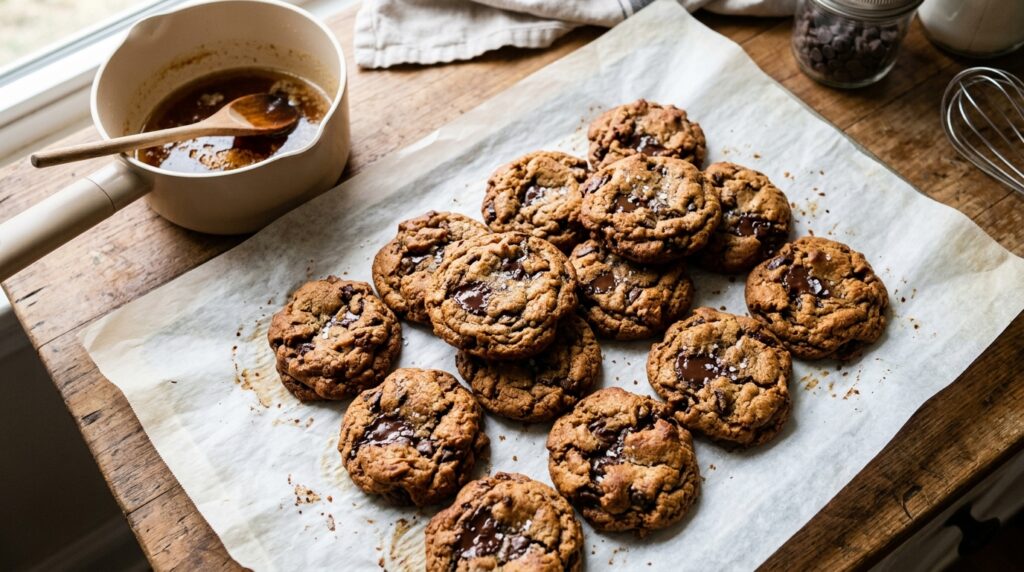
The Classic Brown Butter Chocolate Chip Cookie Recipe
This is the recipe to start with — the one that will make your family immediately understand why brown butter deserves a permanent place in your baking routine. As Sally’s Baking Addiction notes in their brown butter cookie guide, the technique adds deep caramel-like notes and a bakery-style depth that a standard chocolate chip cookie simply cannot match — and the result is thick, chewy, and genuinely spectacular.
Ingredients (Makes 20 to 22 cookies)
- 1 cup (225g) unsalted butter — this will become your brown butter
- 1 cup (220g) light brown sugar, packed
- ½ cup (100g) granulated white sugar
- 2 large eggs, at room temperature
- 1 large egg yolk, at room temperature
- 2 teaspoons pure vanilla extract
- 2¼ cups (290g) all-purpose flour
- 1 teaspoon baking soda
- 1 teaspoon fine sea salt
- 2 cups (340g) semi-sweet chocolate chips or chopped dark chocolate
- Flaky sea salt for finishing
Step 1 — Brown the Butter and Cool It
Follow the brown butter technique described above. Pour the finished brown butter — including all the dark milk solid specks at the bottom, which carry enormous flavor — into a large heatproof bowl. Let it cool to room temperature, or refrigerate until it reaches a liquid but no-longer-hot state. Do not skip the cooling step — adding hot brown butter to your sugars will partially melt them and affect the dough’s final texture.
Step 2 — Whisk the Sugars and Brown Butter
Add both sugars to the cooled brown butter and whisk vigorously by hand for a full 2 minutes. This step is important — it begins the process of dissolving the sugar into the fat and incorporates air into the mixture, which contributes to the final cookie’s texture. You do not need a mixer for this recipe, which makes it ideal for little helpers who love to whisk.
Step 3 — Add Eggs and Vanilla
Add the eggs, egg yolk, and vanilla extract to the butter-sugar mixture. Whisk again until the mixture is smooth, slightly thickened, and ribbony — about 1 minute of good whisking. The extra yolk adds richness and contributes to the cookie’s chewy texture. This is the stage where your dough will begin smelling extraordinary — the combination of brown butter and vanilla at this step is one of the genuinely great kitchen aromas.
Step 4 — Add Dry Ingredients and Chocolate
Sift in the flour, baking soda, and salt. Stir with a spatula until just combined — do not overmix once the flour is added. Fold in the chocolate chips by hand. The dough will be soft and slightly glossy from the liquid brown butter. Cover the bowl tightly and refrigerate for at least 1 hour — and ideally overnight. Chilling is strongly recommended for brown butter cookie dough because it allows the flour to fully hydrate, the flavors to deepen, and the dough to firm up enough to scoop without spreading excessively during baking.
Step 5 — Bake to Golden Perfection
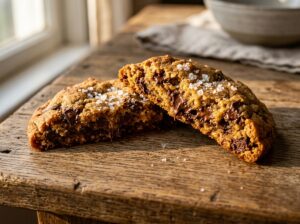
Preheat your oven to 375°F (190°C) and line two baking sheets with parchment paper. Scoop rounded balls of approximately 2 tablespoons each onto the prepared sheets, spacing 2 to 3 inches apart. Bake for 10 to 12 minutes until the edges are golden and set and the centers still look slightly underdone and glossy. Immediately after removing from the oven, sprinkle each cookie with a pinch of flaky sea salt. Cool on the baking sheet for 10 minutes before transferring — they continue firming into their perfect chewy-centered texture as they cool. If you ever have questions about spread, texture, or baking time issues, our cookie troubleshooting guide has practical solutions for every common scenario.
Four More Cookies That Are Even Better With Brown Butter
Once you have browned butter for the first time and tasted the difference it makes, you will start wondering which other cookies deserve the same treatment. The answer is: almost all of them. Here are four cookies that are particularly transformed by the technique.
Brown Butter Snickerdoodles
The warm, cinnamon-forward flavor of snickerdoodles pairs with brown butter in an almost impossibly perfect way. The nutty, toasty quality of the brown butter deepens and rounds the cinnamon, creating a cookie that tastes significantly more complex and satisfying than a standard snickerdoodle while remaining just as soft and pillowy at the center. Use your regular snickerdoodle recipe, simply replacing the softened butter with cooled brown butter. The cinnamon-sugar coating bakes into a slightly crispier shell against the richer dough — and the result is extraordinary.
Brown Butter Sugar Cookies
Plain sugar cookies benefit enormously from brown butter because there is nowhere else for flavor to hide — the brown butter’s nutty, toffee notes become the primary flavor experience of the cookie rather than a supporting note. Brown butter sugar cookies are less sweet-tasting and more complex than their conventional counterparts, with a depth that makes them genuinely interesting to eat rather than simply sweet.
Brown Butter Oatmeal Raisin Cookies
Oatmeal raisin cookies made with brown butter taste like the best oatmeal raisin cookie you have ever had — the nutty brown butter amplifies the toasty quality of the oats and creates a flavor that is warmly reminiscent of toasted granola with caramelized edges. The raisins plump beautifully in this richer dough and provide pockets of fruity sweetness that balance the deep, roasted notes of the butter. This is consistently one of the most requested variations once families discover how much brown butter elevates the classic.
Brown Butter Shortbread
Shortbread is almost entirely butter — which means brown butter shortbread is one of the most dramatic flavor upgrades in the entire cookie world. Where regular shortbread is mild and buttery, brown butter shortbread is complex, nutty, and deeply fragrant. It requires no eggs, no leavening, and almost no technique — just brown butter, sugar, flour, and salt — making it one of the most accessible and rewarding baking projects for children who are just beginning to bake independently.
Tips and Tricks for Perfect Brown Butter Cookies
Do Not Discard the Milk Solid Specks
When you pour your brown butter into the bowl, make sure every last dark speck from the bottom of the pan goes with it. Those specks are the toasted milk solids — they are the source of the majority of brown butter’s flavor, and scraping them into your dough is essential. Bakers who strain them out are throwing away the most valuable part of the whole process.
Always Cool Before Using
Room-temperature or slightly cool brown butter is essential for a properly structured cookie dough. Hot brown butter will partially melt your sugar when whisked together, creating a dough that spreads too much and loses its chewy center. If you are in a hurry, pour the finished brown butter into a wide, shallow bowl to increase surface area and place it in the refrigerator for 15 minutes — it will cool to the right temperature quickly.
Chill the Dough for Best Results
Brown butter cookie dough benefits more from chilling than standard dough because the liquid butter needs time to be absorbed by the flour and firm up. A minimum of one hour in the refrigerator — and up to 48 hours — produces progressively better results. The flavor deepens, the texture improves, and the cookies spread more evenly and beautifully. If you want to make the dough ahead and bake fresh later, this is a wonderful option. For comprehensive make-ahead and freezing guidance for all cookie types, see our ultimate cookie storage and freezing guide.
Use a Light-Colored Pan — Always

This cannot be overstated. A dark non-stick pan makes it virtually impossible to see when the milk solids are browning — you risk burning the butter before you realize it has reached the right color. A light stainless steel or enameled pan is the right tool for this job, every time. If you only have dark pans, use the lowest heat setting and rely entirely on the smell — perfectly browned butter smells nutty and fragrant, while burnt butter smells acrid and sharp.
Make Brown Butter Cookies Your Family’s Signature Bake
Every family that bakes together develops its signature recipes — the cookies that come out at every gathering, the ones guests always ask about, the ones children remember making with their parents and grandparents for years afterward. Brown butter cookies have all the qualities of a signature bake. They are special without being complicated. They are impressive without being stressful. And they taste so unmistakably, memorably good that anyone who tries one wants to know how you made them.
The answer — brown butter — is always simpler than people expect. And sharing that technique with the children in your kitchen, watching them learn to watch the butter transform from pale yellow to golden amber, teaching them to trust their nose as much as their eyes — that is one of the small, genuine joys of baking together that stays with everyone long after the cookies are gone.
For more ideas on elevating your family’s cookie baking from everyday to extraordinary, our posts on fun and easy cookie recipes for kids and the secret to baking perfect cookies with your kids are packed with ideas, techniques, and inspiration for your next kitchen session together.
Happy baking from all of us at Mommy and Me Cookies! 🍪