
Royal icing is a popular choice for decorating cookies and other baked goods due to its smooth finish and candy-like shell. It is made from simple ingredients like powdered sugar and water, often with the addition of egg whites or meringue powder. What makes royal icing especially appealing for kids is its versatility and ease of use.
Key takeaway: With simple royal icing techniques, even kids can create beautiful and delicious cookie decorations!
In this article, you will learn:
- The basics of royal icing and its components
- Kid-friendly recipes that are safe and easy to make
- Basic decorating techniques like outlining and flooding
- Creative methods to practice and perfect designs
- Essential tools for a mess-free and enjoyable experience
By mastering these simple techniques, your family can enjoy fun-filled, creative cookie decorating sessions.
Understanding Royal Icing
Ingredients

Royal icing is primarily made from a few simple ingredients: powdered sugar, egg whites or meringue powder, and water. Each component plays a crucial role:
- Powdered Sugar: This is the main ingredient that provides structure and sweetness.
- Egg Whites or Meringue Powder: These help the icing to harden and create a smooth finish. For kid-friendly recipes, meringue powder can be omitted.
- Water: Essential for adjusting the consistency of the icing to suit various decorating techniques.
Consistency
The consistency of royal icing can be adjusted depending on its intended use. There are three main consistencies:
- Stiff Consistency: Ideal for detailed work like piping intricate designs or flowers.
- Medium Consistency: Suitable for outlining shapes on cookies.
- Flood Consistency: Perfect for filling in outlined areas smoothly.
To achieve the desired consistency, start by mixing the ingredients until stiff peaks form. Gradually add water in small amounts to thin the icing to medium or flood consistency.
Gel Food Coloring
Using gel food coloring is essential for vibrant and long-lasting colors without altering the icing’s consistency. Unlike liquid food coloring, gels are concentrated, requiring only a small amount to achieve bold hues. Here’s why gel food coloring is recommended:
- Vibrancy: Produces bright and consistent colors.
- Stability: Maintains color intensity over time.
- Control: Allows precise adjustment of color without thinning the icing.
Experimenting with different colors can make cookie decorating an exciting activity for kids, encouraging creativity and artistic expression.
Simplified Royal Icing Recipes for Kids
Traditional royal icing recipes usually call for meringue powder or raw egg whites, which can feel intimidating or raise safety concerns when working with young children. Kid-friendly alternatives deliver the same decorative results without requiring special ingredients or complicated steps.
No Meringue Powder Needed
Eliminating meringue powder makes royal icing simpler and safer for kids. This easy recipe uses basic pantry staples and still produces a smooth, hardening finish:
- 2 cups powdered sugar
- 2–3 tablespoons milk (add more as needed)
- 1 tablespoon light corn syrup
- ½ teaspoon vanilla extract
Instructions:
- Whisk powdered sugar and milk together until smooth.
- Mix in corn syrup and vanilla. The icing should be thick enough to outline cookies but flow easily when piped.
- Add additional milk in small amounts if a thinner consistency is needed for flooding.
Corn Syrup Substitute for Glossy Finish
Light corn syrup acts as a simple substitute, giving royal icing its signature shine without eggs or specialty powders. It also helps keep the icing soft enough for little hands to work with longer before it dries completely.
Tip: For an allergy-friendly version, swap out dairy milk for plant-based alternatives like oat or almond milk.
Why This Recipe Works for Kids
- No risk of raw egg exposure
- Ingredients are safe and familiar
- Quick mixing by hand (no electric mixer required)
- Easy to divide into bowls for different colors
Color can be added with gel food coloring at this stage — just stir in a drop at a time until the desired vibrancy is reached.
This base recipe sets up well for outlining, flooding, and creative decorating, letting kids focus on fun rather than fussing over technique or unusual ingredients.
Basic Royal Icing Decorating Techniques
Mastering basic royal icing decorating techniques can be a fun and rewarding experience for kids. Two primary techniques to focus on are outlining and flooding, both of which are simple enough for young decorators to try.
Step-by-Step Process of Outlining and Flooding Cookies with Royal Icing
-
Outlining
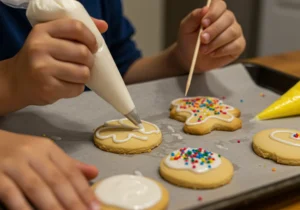
- Use thicker royal icing for outlining the cookie.
- Fill a piping bag or squeeze bottle with the thick icing.
- Carefully trace the outer edge of the cookie, creating a barrier that will hold the thinner icing in place when you flood the interior.
- For better control, keep a steady hand and apply gentle pressure on the bag or bottle.
-
Flooding
- Once the outline is dry, fill another piping bag or squeeze bottle with thin royal icing.
- Gently squeeze the thin icing inside the outlined area, using a toothpick or small spatula to spread it evenly if needed.
- Allow the flooded area to dry completely before adding any additional decorations.
Incorporating Sprinkles into Your Designs
Adding sprinkles can enhance your cookie designs by providing extra fun and texture:
- Apply Immediately After Flooding: While the flood icing is still wet, gently sprinkle your choice of decorations over the cookies. This allows them to stick securely as the icing dries.
- Creating Patterns: Arrange sprinkles in specific patterns or shapes to create unique designs. This can be done by placing them individually with tweezers or a toothpick.
These simple royal icing techniques — outlining, flooding, and incorporating sprinkles — are easy for kids to master. They provide an enjoyable way to decorate cookies while allowing for creativity and personal expression.
Kid-Friendly Decorating Methods to Try
Practicing royal icing techniques on plastic wrap is a great way to get kids comfortable with decorating before they start on actual cookies. Simply lay out a sheet of plastic wrap and let them practice outlining and flooding. This way, they can try different methods and get a feel for the consistency without worrying about making mistakes on their cookies.
Wet-on-wet technique
This involves adding a second color of royal icing onto wet icing to create beautiful, blended designs.
Steps to follow:
- Start by outlining and flooding the cookie with your base color.
- While the base layer is still wet, add dots or lines of another color.
- Use a toothpick or scribe tool to drag through the colors, creating marbling or other patterns.
Wet-on-dry technique
Allows for more detailed designs.
Steps to follow:
- Begin with an outlined and flooded base layer of icing, allowing it to dry completely (usually takes a few hours).
- Once dry, add decorations like dots, lines, or patterns with a different color.
- This technique ensures the details stand out crisply against the background.
These methods are both engaging and manageable for kids, letting them experiment with creativity while mastering basic royal icing skills.
Essential Tools for Kids’ Royal Icing Decorating
Using the right tools can make royal icing decorating much easier, especially for kids.
Piping Bags and Squeeze Bottles
Piping bags and squeeze bottles are essential for precise control over icing application. Each comes with its own set of benefits:
Benefits of Piping Bags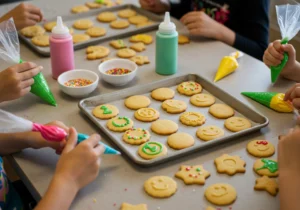
- Allow for fine detail work with interchangeable tips.
- Easy to refill without making a mess.
- Offer a good grip, which is important for steady hands.
Benefits of Squeeze Bottles
- Perfect for younger children who might struggle with piping bags.
- Simple to use and control the flow of icing with just a squeeze.
- Reduce the likelihood of spills and overflows.
Both tools help ensure that the icing goes exactly where it’s intended, making it easier to create clean lines and detailed designs. You can also explore additional macaron tools that can enhance your baking experience.
Tray Placement
A tray is an indispensable tool during the decorating process. Here’s why:
Benefits of Using Trays
- Keeps your workspace clean by catching any stray drips or spills.
- Makes cleanup quicker and less stressful, especially when working with kids.
- Provides a designated area for decorating, helping kids focus on their cookie designs.
- Keeps all necessary tools and cookies in one place, reducing clutter.
Using trays also teaches children about maintaining a tidy workspace, an important habit to develop early on. The use of trays can also be extended to other fun activities like making potions, which can serve as an engaging sensory activity for kids.
By incorporating these essential tools — piping bags, squeeze bottles, and trays — you can make the royal icing decorating process smoother and more enjoyable for kids.
Making Royal Icing Decorating Fun and Mess-Free for Kids
Squeeze bottles are a game-changer when it comes to helping kids control the flow of icing. Their smaller openings let little hands apply just the right amount without flooding cookies or making a sticky mess. Kids often find squeeze bottles less intimidating than traditional piping bags, so they’re more likely to experiment using these simple royal icing techniques that even kids can master.
Preventing messes is all about setup and smart technique:
- Use shallow trays or rimmed baking sheets: Place cookies on these surfaces before decorating. Any icing drips or runaway sprinkles stay contained, keeping your work area tidy and cleanup quick.
- Sprinkle management: Pour sprinkles into small bowls and let kids pinch or spoon them onto wet icing instead of shaking directly from large containers. This method gives more control and prevents spills.
- Work in small batches: Decorate a few cookies at a time so kids can focus without getting overwhelmed, and you can keep an eye on the drying process for each batch.
The drying process is another opportunity for mess prevention. Let cookies set on parchment-lined trays in a single layer — no overlapping — to avoid transferring sticky icing from one to another. This simple setup makes it easy for everyone to admire their creations while the royal icing dries to a perfect, glossy finish.
Conclusion
Cookie decorating with royal icing is a fun family activity that encourages creativity and brings everyone together. By using simple techniques that even kids can learn, like outlining, flooding, and adding sprinkles, you can turn baking into an enjoyable holiday tradition.
The happiness of creating together, one decorated cookie at a time, not only creates lasting memories but also boosts the festive spirit. With these easy-to-follow methods, every family member can help make beautiful and tasty treats. Happy decorating!