Imagine this: it is after school, the kitchen smells incredible, and your kids are gathered around the counter watching you slice into a pan of something that looks like a brownie but somehow also looks like a cookie. They take one bite — and their eyes go wide. That is the brookie effect. And once you make them, you will wonder how you ever baked without this recipe in your rotation.
Hybrid baked goods have been having a moment in home kitchens for several years now, and brookies are among the most enduring and beloved of them all. According to Tastewise’s 2026 Pastry and Baking Trends report, hybrid baked formats continue to lead consumer demand — and brookies are specifically highlighted as one of the most home-baker-friendly of the category, delivering that irresistible gooey center and crispy edge combination that defines what people are craving right now.
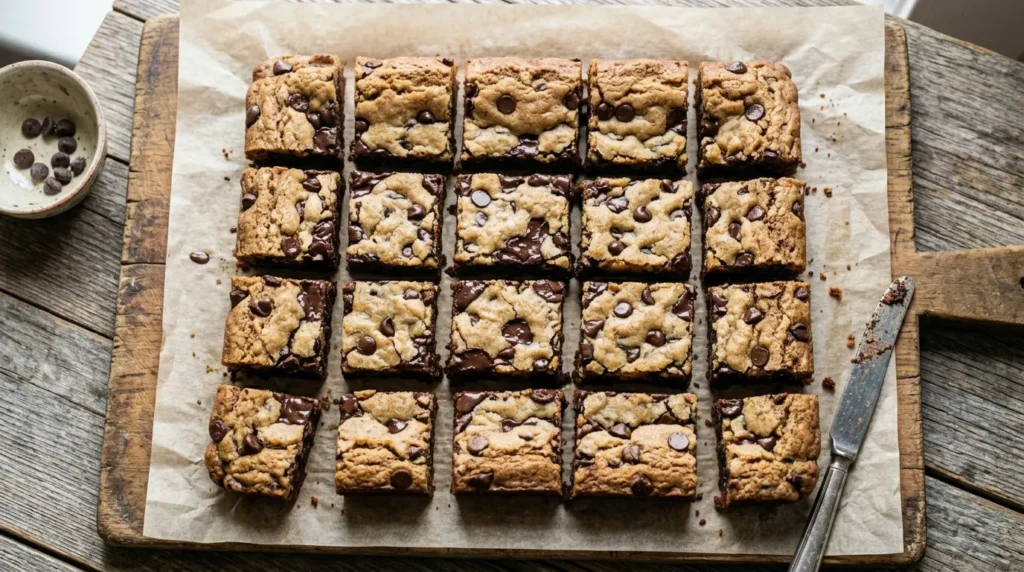
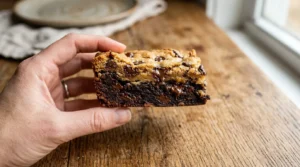
Brookies are exactly what they sound like: a glorious, completely unapologetic mashup of a fudgy chocolate brownie and a chewy chocolate chip cookie, baked together in one pan to create a dessert that delivers the best of both worlds in a single, deeply satisfying bite. The name itself is a portmanteau — brownie meets cookie — and the result is a bar that is rich and dense at the base, with a golden, slightly crisp cookie layer on top that adds texture, sweetness, and that familiar chocolate chip warmth your whole family already loves.
At Mommy and Me Cookies, we love a bake that feels special without being complicated — and brookies are exactly that. They are a project the whole family can tackle together on a Saturday morning, and they are absolutely guaranteed to disappear faster than you expect.
Why Brookies Are the Perfect Family Baking Project
Hybrid baked goods have been having a moment in home kitchens for several years now, and brookies are among the most enduring and beloved of them all. Unlike some of the more elaborate hybrid pastries that require specialty ingredients or professional techniques, brookies are genuinely home-baker-friendly. You do not need laminated dough, a special pan, or any equipment beyond a standard mixing bowl and a rectangular baking tin. The result looks and tastes bakery-level, but the process is approachable enough for little helpers at every stage.
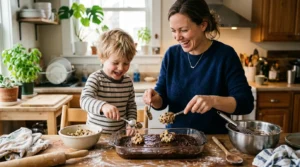
What makes brookies especially great for family baking is that they involve two separate batters — which means there are twice as many bowls to lick, twice as many mixing tasks to share, and a genuinely exciting layering stage where kids get to spoon the cookie dough over the brownie batter and watch the two layers come together. The whole project takes about 20 minutes of hands-on time, which is the sweet spot for keeping little ones engaged without losing their attention.
You have already met brookies’ closest relatives on this blog — if you loved making our viral crookies at home, or if you and your kids have been obsessed with our mookies recipe, then brookies are the next essential hybrid to add to your family baking collection. They complete a trio of kid-friendly mashup bakes that are each completely different in texture and flavor — but equally irresistible.
What You Need to Make Brookies
This recipe makes one 9×13-inch pan of thick, rich brookies — enough for the whole family with plenty left over for school lunches and afternoon snacks. You will need ingredients for two batters: the brownie layer and the cookie layer. Everything here is a standard pantry staple, and the whole ingredient list can be gathered in a single trip to the grocery store.
For the Brownie Layer
- ½ cup (115g) unsalted butter, melted
- 1 cup (200g) granulated white sugar
- 2 large eggs, at room temperature
- 1 teaspoon pure vanilla extract
- ⅓ cup (35g) unsweetened cocoa powder
- ½ cup (65g) all-purpose flour
- ¼ teaspoon baking powder
- ¼ teaspoon fine sea salt
- ½ cup (85g) semi-sweet chocolate chips
For the Cookie Layer
- ½ cup (115g) unsalted butter, softened to room temperature
- ½ cup (100g) granulated white sugar
- ½ cup (110g) light brown sugar, packed
- 1 large egg, at room temperature
- 1 teaspoon pure vanilla extract
- 1¼ cups (160g) all-purpose flour
- ½ teaspoon baking soda
- ¼ teaspoon fine sea salt
- 1 cup (170g) semi-sweet or milk chocolate chips
Optional but Highly Recommended
A sprinkle of flaky sea salt over the top before baking adds a wonderful contrast to all that chocolate sweetness. If your kids are into sprinkles, rainbow sprinkles pressed into the cookie dough layer before baking make for a fun, festive variation — a birthday brookie moment that always lands with little ones.
How to Make Brookies — Step by Step
The key to perfect brookies is making both batters before you start layering, so everything goes into the oven at the same temperature. Read through all the steps once before you begin — it makes the whole process much smoother.
Step 1 — Prepare the Pan
Preheat your oven to 350°F (175°C). Line a 9×13-inch baking pan with parchment paper, leaving some overhang on the long sides. As MasterClass notes in their brookie guide, chilling both batters before baking helps them go into the oven at the same temperature — so if your kitchen is warm, a 15-minute rest in the fridge for both bowls is a worthwhile step. This overhang is your best friend — it lets you lift the entire slab out of the pan cleanly once cooled, making slicing and serving dramatically easier. Lightly grease the parchment with non-stick spray or butter.
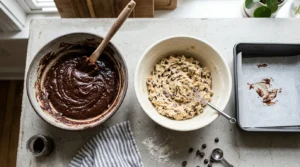
Step 2 — Make the Brownie Batter
In a large mixing bowl, whisk together the melted butter and sugar until combined. Add the eggs one at a time, whisking well after each, then mix in the vanilla. Sift in the cocoa powder, flour, baking powder, and salt. Stir with a spatula until just combined — do not overmix. Fold in the chocolate chips. Pour the brownie batter into your prepared pan and spread it into an even layer. This is a great job for your oldest helper — spreading batter evenly is satisfying, manageable, and makes a real visible difference.
Step 3 — Make the Cookie Dough
In a separate bowl, beat the softened butter with both sugars until light and fluffy — about 2 minutes with a hand mixer or a good 3 to 4 minutes by hand. Beat in the egg and vanilla until smooth. Add the flour, baking soda, and salt, mixing until just combined. Fold in the chocolate chips. The dough should be soft but not sticky.
Step 4 — Layer the Dough
Here is the most fun part of the whole baking session. Drop rounded tablespoons of cookie dough all over the top of the brownie batter. You do not need to cover every inch — leaving some dark brownie peeking through creates that beautiful marbled, craggy top that makes brookies look so impressive once they are baked. Gently press each dollop down slightly with the back of a spoon. Kids absolutely love this step — give them the spoon and let them place the dough however they like.
Step 5 — Bake
Bake for 28 to 32 minutes, until the cookie layer is golden at the edges and set in the center. A useful technique recommended by Once Upon a Chef is to cover the pan with aluminum foil for the first 20 minutes of baking — this prevents the cookie layer from browning too quickly while the brownie base catches up — then uncover for the final 10 to 12 minutes to get that perfect golden finish. A toothpick inserted 2 inches from the side of the pan should come out with a few moist crumbs — not wet batter. The center will look slightly underdone when you pull it from the oven, and that is exactly right. It will firm up as it cools and become fudgy and dense in the most perfect way. If you run into any baking questions along the way, our cookie troubleshooting guide covers the most common issues with easy fixes for each.
Step 6 — Cool and Slice
This is the hardest step: patience. Let the brookies cool in the pan for at least 30 minutes before lifting them out and slicing. Cutting too early means the layers will not hold together cleanly. Once cool, use the parchment overhang to lift the whole slab onto a cutting board and slice into bars with a sharp knife. For clean, neat slices, wipe the knife blade between cuts.
Brookie Variations to Try With Your Kids
Once you have mastered the classic version, brookies are an incredible canvas for experimentation. Here are four family-tested variations that all get enthusiastic approval.
Peanut Butter Brookies
Add 3 tablespoons of creamy peanut butter to your brownie batter and swirl it through with a knife before adding the cookie layer. Peanut butter and chocolate is one of the great flavor pairings in all of baking, and it takes brookies to an entirely different level of richness.
Birthday Brookies
Stir ½ cup of rainbow sprinkles into your cookie dough layer and add ½ teaspoon of almond extract for a funfetti-style cookie layer. Press a few extra sprinkles on top before baking. These are a show-stopping birthday party treat that kids go absolutely wild for — and they require zero fondant, zero decorating, and zero stress.
White Chocolate and Raspberry Brookies
Swap the chocolate chips in the cookie layer for white chocolate chips and press 10 to 12 fresh raspberries gently into the cookie dough before baking. The berries burst and jammy during baking, creating beautiful pockets of fruity sweetness against the white chocolate and rich brownie base.
S’mores Brookies
Add a layer of mini marshmallows and crushed graham crackers between the brownie and cookie layers before baking. The marshmallows melt into gooey pockets and the graham cracker crumbs add a subtle crunch — taking the already irresistible brookie into campfire territory that kids adore.
How to Store Brookies and Make Them Ahead
Brookies store beautifully and actually taste even better on day two, when the layers have had time to fully meld together and the brownie base becomes even fudgier. Store them in an airtight container at room temperature for up to 5 days, or in the refrigerator for up to 7 days. For longer storage, freeze individual bars wrapped in plastic wrap and stored in a freezer-safe bag for up to 3 months — thaw at room temperature for about 30 minutes or microwave for 15 to 20 seconds for that warm, just-baked experience. For a complete breakdown of the best storage methods, see our ultimate guide to storing and freezing cookies.
You can also make the batter ahead of time. The brownie batter keeps covered in the refrigerator for up to 24 hours, and the cookie dough keeps for up to 3 days. When you are ready to bake, simply spread the brownie batter into the pan from cold — it will spread more slowly but still bake perfectly — and drop the cookie dough on top as usual.
One Pan, Two Layers, Endless Smiles
There is something so satisfying about a dessert that solves a problem — and brookies solve the most universal baking dilemma there is. Brownies or cookies? Both. Always both. In one pan. With one baking time. And more than enough to go around.
For families who love to bake together, brookies hit a particular sweet spot. They are hands-on and engaging at every stage, they produce something genuinely impressive with beginner-level effort, and they taste so good that everyone at the table goes quiet for a moment after the first bite — which, in a house full of kids, is a rare and wonderful thing.
Make the classic version first. Then start exploring. Birthday brookies for the next party, peanut butter brookies for a Tuesday afternoon, s’mores brookies for a movie night that feels like a celebration. The pan is always ready for the next idea, and so are your little bakers.
Happy baking from all of us at Mommy and Me Cookies! 🍪