You have the birthday date locked in, the guest list ready, and a beautiful Cookie Kit sitting on the counter. But here is a thought that will make this birthday truly unforgettable: what if the Cookie Kit was not just the treat — but the main event?
Cookie kit birthday parties are one of the most popular and practical kids’ party activities of 2026, and for very good reason. They combine creativity, hands-on fun, and a delicious take-home treat all in one activity. Instead of paying for an entertainer or renting equipment, the decorating station becomes the party itself — and every single child walks away with something they made with their own hands. That is the kind of birthday memory that sticks.
Whether you are planning a small gathering at home or a bigger celebration, this guide walks you through everything you need to turn your Mommy and Me Cookie Kit into a birthday party activity your guests — and your birthday child — will absolutely love.
Why a Cookie Kit Makes the Perfect Birthday Party Activity
Birthday parties in 2026 are shifting decisively toward experience-first celebrations — parties where kids are active participants rather than passive guests. According to Classpop’s 2026 party guide, cookie decorating ranks among the top hands-on party activities because it works for every age group, requires no special skills, and doubles as both entertainment and dessert in one effortless setup.
The advantages over traditional party formats are real and practical. There is no waiting around for a hired entertainer to arrive. There are no complicated logistics to manage. Every child gets their own creative workspace, their own cookies to decorate, and their own masterpiece to take home — which also doubles as the perfect party favor. Parents love the simplicity. Kids love the freedom. And the birthday child gets to feel like a host and a creator all at once.
If you have already hosted our mommy-and-me style decorating session at home, you already know how joyful this activity can be. This post takes that same magic and scales it up into a full birthday party format that works beautifully for groups of 6 to 20 kids.
How to Set Up Your Cookie Kit Decorating Station
The setup is everything. A well-organized decorating station keeps the activity flowing smoothly, minimizes mess, and makes the experience feel special and intentional rather than chaotic. Here is how to do it right.
Cover the Table First
This is the single most important practical step. Use a disposable paper tablecloth in the birthday child’s favorite color or theme — it protects the table completely, adds instant party decoration, and makes cleanup a two-second job when the activity is done. Pull up any rugs nearby, since icing has a way of finding its way to the floor no matter how careful everyone tries to be.
Give Each Child Their Own Station
Set up individual workspaces rather than a shared table. Each child gets their own sturdy paper plate or small tray, their own set of cookies from the kit, and their own piping bag or icing squeeze bottle. Shared sprinkle bowls in the center of the table work well — just make sure there is a spoon in each bowl so children can scoop rather than pour directly. Individual stations give every child ownership of their space and eliminate the inevitable disputes over who gets which sprinkles first.
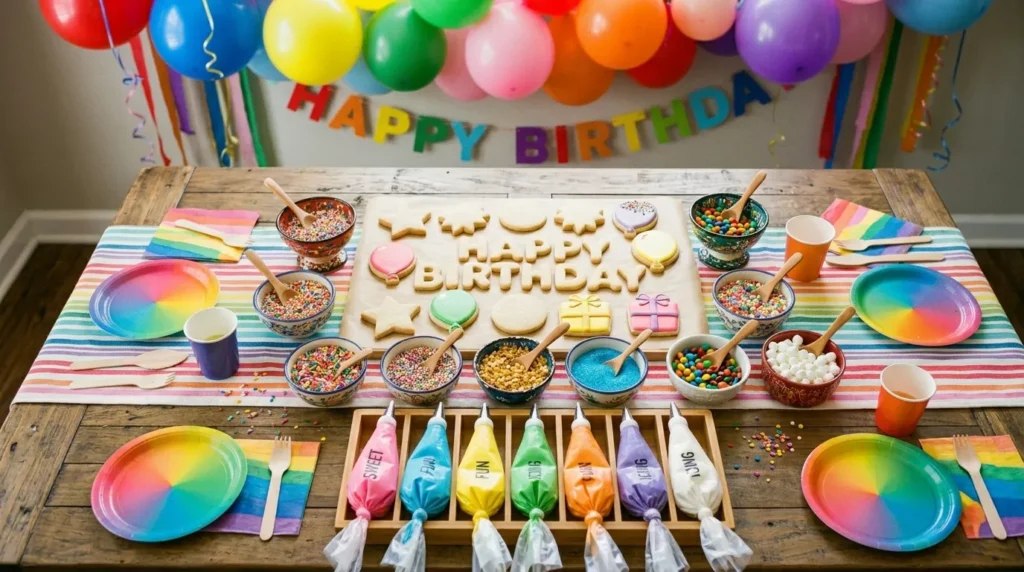
Set Up a Sprinkle and Topping Bar
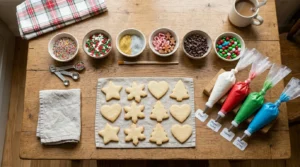
This is where the station goes from functional to magical. Arrange small bowls of different toppings down the center of the table — colored sprinkles, edible glitter, mini chocolate chips, candy pearls, rainbow jimmies, and any themed toppings that match the birthday theme. Label each bowl with a small tent card if you want to add an extra touch. The visual abundance of options is genuinely exciting for kids and instantly communicates that this is a real, special activity — not an afterthought.
Prepare Icing in Squeeze Bottles
Piping bags with tips are beautiful for finished results, but for a kids’ birthday party, squeeze bottles are the practical hero. As Sally’s Baking Addiction recommends for cookie decorating parties, filling icing into squeeze bottles gives kids much more control than piping bags, reduces mess significantly, and means children from age 4 upward can use them independently without frustration. Pre-fill bottles in 3 to 4 colors before the party starts — this is the most time-consuming part of the setup, so do it the evening before if you can.
Cookie Kit Birthday Party Timeline That Actually Works
One of the most common concerns parents have about activity-based parties is timing. Will it hold their attention? Will some kids finish too fast and get bored? Here is a timeline that keeps energy high and the whole group engaged from start to finish.
Before Guests Arrive — 30 to 60 Minutes
Set up your stations completely, fill all icing bottles, arrange the sprinkle bar, and put 4 to 6 cookies at each child’s place. If you have name cards, add them now — kids love finding their designated spot. Have aprons or old T-shirts ready to hand out as guests arrive. Set the mood with a birthday playlist in the background.
When Guests Arrive — First 10 to 15 Minutes
Give each child an apron as they sit down at their station. Do a quick, fun 2-minute demo — show them one basic technique, like how to squeeze a line of icing and drag a toothpick through it to make a marbled effect, or how to flood a cookie by outlining and filling. Keep it short and silly — kids at a birthday party want to start, not watch. Then say “go” and let the creativity begin.
Decorating Time — 25 to 35 Minutes
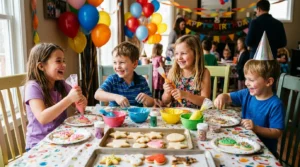
This is the heart of the party. Let kids decorate freely and at their own pace. Wander the table offering encouragement rather than instruction. Some children will want to cover every millimeter of their cookie in sprinkles — that is wonderful. Others will carefully plan each color — that is equally wonderful. Resist the urge to guide the aesthetic. The most memorable results come from complete creative freedom. Keep a roll of paper towels at each end of the table for quick cleanups, and have wet wipes accessible for sticky hands.
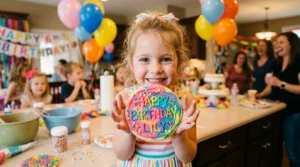
Photo Time — 5 Minutes
Before anyone takes a bite, gather everyone for a photo with their finished creations. A group shot of all the decorated cookies lined up is always a stunning image — and it captures the highlight of the whole party in one frame. Individual photos of each child holding their masterpiece are sweet keepsakes that parents genuinely cherish. This is a natural energy moment between decorating and eating that keeps the flow going without any dead time.
Eating and Cake — 20 to 30 Minutes
After photos, transition naturally into eating the decorated cookies, singing happy birthday, and serving cake if you are having one. The cookies serve double duty here — they are both the activity result and part of the dessert spread, which means you can scale back on other sweet treats and simplify the food menu considerably.
Age-by-Age Decorating Tips for Mixed Groups
Most birthday parties involve a range of ages — the birthday child’s friends plus younger or older siblings. A little preparation for each age group ensures everyone stays engaged and feels successful.
Ages 3 to 5 — Simple and Sensory
Toddlers and young children are perfectly happy flooding a cookie with one color of icing and then adding as many sprinkles as physically possible. Give them squeeze bottles with a slightly wider opening for easier control. Pre-outline their cookies with white icing if you want cleaner results — they can fill in the shape with their chosen color. Focus entirely on fun and freedom rather than technique.
Ages 6 to 9 — Creative and Expressive
This is the sweet spot for cookie decorating parties. Kids this age love following simple techniques but also love putting their own creative spin on everything. Show them the marble drag, the ombre fade, and the dots-in-a-row pattern before you start — they will run with all three and invent five new techniques of their own. This age group especially loves themed cookies that match the party theme.
Ages 10 and Up — Skilled and Detailed
Older kids often want more challenge and refinement. Consider giving them a piping bag with a fine tip in addition to the squeeze bottle so they can try detailed writing, fine lines, and small designs. A little competition — a friendly “most creative” or “most colorful” category — adds fun engagement for this age group without making anyone feel bad. For more creative cookie decorating techniques that work beautifully for this age group, see our guide to creative cookie decorating ideas for kids.
Party Favors That Double as Take-Home Treats
One of the best things about a cookie kit birthday party is that the party favor virtually takes care of itself. Each child’s decorated cookies are their take-home gift — no need to fill goodie bags with candy or cheap toys that end up in the trash. Set up a simple packaging station at the end of the activity: a small cellophane treat bag, a ribbon in the birthday theme colors, and a small sticker tag that says “made by [child’s name]” transforms each child’s cookies into a genuinely beautiful, personalized favor that parents will actually appreciate receiving.
If you want to send a little extra something home, a small card with simple cookie decorating tips or a mini recipe card is a thoughtful touch that keeps the baking spirit alive after the party ends. For more on our Cookie Kits and everything they include for family baking fun, check out our full guide to the best cookie kits for family fun.
One Simple Activity, One Unforgettable Birthday
The best birthday parties are not the ones with the biggest budget or the most elaborate setup. They are the ones where every child feels like a creative contributor — where the activity itself is the memory, and the treat is the icing on top. A cookie kit decorating station delivers exactly that, every single time.
It is endlessly adaptable. It works at home, in a backyard, in a community hall, or even as a drop-off activity for older kids. It scales beautifully from 4 guests to 20. It requires no special skills from the host and no complicated cleanup. And it produces something tangible, personal, and delicious that every child genuinely walks away proud of.
If you have questions about setting up the perfect decorating station or need help planning the cookie portion of your party, our post on how to host a mommy-and-me cookie decorating party has every detail you need. Now grab the kit, set the table, and get ready to host the most creative birthday on the block.
Happy baking — and happy birthday! 🍪🎉