It is 4pm on a Tuesday. The kids are home, everyone is hungry, and there is a unanimous, enthusiastic vote for cookies. You have exactly 35 minutes before the whole situation deteriorates. You could scoop 24 individual cookies onto two baking sheets, rotating them halfway through, watching the clock — or you could press the entire batch of dough into a single pan, slide it into the oven, and be done with the hard work in about 90 seconds.
That second option is a cookie bar — and it is one of the most useful, underrated, and genuinely delicious formats in the entire family baking playbook. Cookie bars deliver everything you love about your favorite cookies: the chewy center, the slightly crisp edges, the pockets of melted chocolate, the warm caramel notes of brown sugar — in a single pan, with no scooping, no chilling, no rotating trays, and cleanup that takes about two minutes. At Mommy and Me Cookies, we believe that the best family baking moments happen when the process is simple enough that everyone can participate without stress — and cookie bars are the purest expression of that philosophy.
What Are Cookie Bars and Why Are They So Popular?
Cookie bars — sometimes called bar cookies, pan cookies, or slab cookies — are simply cookie dough baked in a rectangular pan rather than scooped and shaped into individual rounds. The dough is pressed or spread into a greased and parchment-lined pan, baked as one large slab, and then cut into bars or squares after cooling. The result tastes almost identical to a standard batch of cookies, with one important textural difference: the edges are crisp and slightly caramelized, while the center stays thick, soft, and fudgy — an interior texture that is actually difficult to achieve with individual cookies and that many bakers consider the best possible cookie texture.
The format has surged in popularity in 2025 and 2026 for reasons that make complete sense for busy families. As Sally’s Baking Addiction describes their beloved M&M cookie bars, “when you need a big batch of cookies but are pressed for time — or mental energy — cookie bars are the solution.” That honest, relatable framing captures exactly why so many home bakers are turning to the format: it is not a compromise on quality, it is an upgrade on convenience that makes great baking accessible on any day of the week.
Cookie Bars vs. Brownies — What Is the Difference?
The most common question about cookie bars is how they differ from brownies. The answer is straightforward: brownies are made with a specific batter built around melted chocolate and a high ratio of fat to flour, producing a fudgy, dense, distinctly chocolatey result. Cookie bars use the same dough structure as a standard cookie recipe — creamed butter, sugar, eggs, flour, and leavening — and produce a result that tastes like a cookie rather than a brownie, with the same familiar flavors and slightly lighter, chewier crumb. The format is the same; the flavor and texture profile is distinctly cookie.
Why Kids Love Making Cookie Bars
For families baking together, cookie bars offer a particularly child-friendly experience. There is no cookie scoop to wrestle with, no concerns about evenly sized portions, and no need to work in batches. The entire process — mixing the dough, pressing it into the pan, adding mix-ins on top — involves steps that are genuinely manageable for children from age three upward. And pressing the dough into the pan is consistently one of children’s favorite baking tasks: it is tactile, immediately satisfying, and produces a visibly complete result that makes little ones feel enormously capable.
The Master Cookie Bar Recipe — One Pan, Endless Variations
This is the foundational recipe — a thick, chewy, deeply golden chocolate chip cookie bar that works as a base for every variation that follows. As A Farm Girl’s Dabbles’ widely loved cookie bar recipe confirms, the key to great cookie bars is a dough with a slightly higher brown sugar ratio than a standard cookie — the extra molasses in the brown sugar keeps the center soft and fudgy during the longer bake time required for a full pan versus individual cookies. No mixer required, no chilling, one bowl.
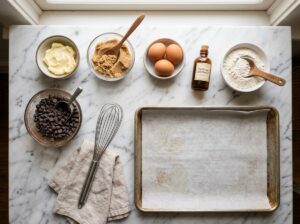
Ingredients (Makes one 9×13-inch pan — 24 bars)
- 1 cup (225g) unsalted butter, melted and slightly cooled
- 1½ cups (330g) light brown sugar, packed
- ½ cup (100g) granulated white sugar
- 2 large eggs, at room temperature
- 1 large egg yolk, at room temperature
- 2 teaspoons pure vanilla extract
- 2½ cups (320g) all-purpose flour
- 1 teaspoon baking soda
- 1 teaspoon fine sea salt
- 2 cups (340g) semi-sweet chocolate chips — divided
- Flaky sea salt for finishing (optional but highly recommended)
Why Melted Butter?
Unlike most cookie recipes that call for softened butter, this recipe uses melted butter — and that is intentional. Melted butter produces a denser, chewier, fudgier bar because it does not incorporate air during creaming. Combined with the extra brown sugar and the egg yolk, it creates the thick, rich center texture that makes cookie bars so satisfying. It also means the entire dough comes together in one bowl with a spatula — no mixer needed at any stage.
Step 1 — Prepare the Pan
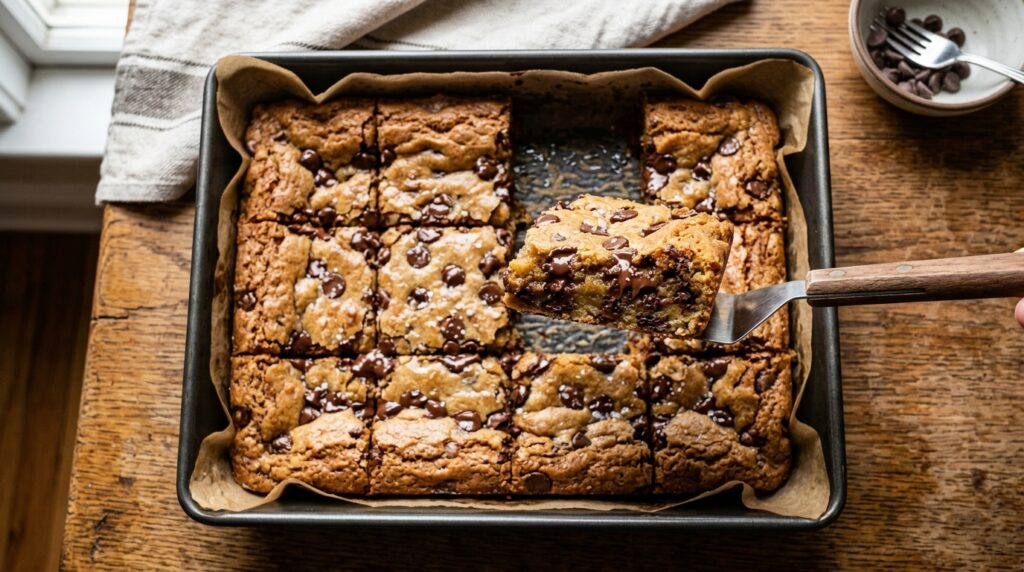
Preheat your oven to 350°F (175°C). Line a 9×13-inch baking pan with parchment paper, leaving overhang on the two long sides to create handles for lifting the baked slab out of the pan. Lightly grease the parchment. This setup makes removing and cutting the bars after baking dramatically easier and produces clean, neat squares every time.
Step 2 — Mix the Dough
In a large mixing bowl, whisk the melted butter with both sugars until fully combined and smooth — about 1 minute. Add the eggs, egg yolk, and vanilla and whisk again until the mixture is smooth and slightly thickened. Add the flour, baking soda, and salt and stir with a spatula until just combined — do not overmix. Fold in 1½ cups of the chocolate chips, reserving the remaining ½ cup for the top.
Step 3 — Press Into the Pan
Transfer the dough to your prepared pan and spread it into an even layer using a spatula — or your hands, which work even better. This is the step to hand off to your little helpers. Press the dough firmly and evenly into every corner and edge of the pan. Scatter the reserved ½ cup of chocolate chips over the top and press them gently into the surface. This two-stage chocolate chip approach ensures chocolate chips throughout the bars and a beautiful chocolate-studded top that looks professionally made straight from the oven. Sprinkle with flaky sea salt if using.
Step 4 — Bake
Bake for 22 to 26 minutes, until the edges are golden brown and set and the center looks slightly underdone and puffy. The center will deflate slightly as the bars cool and will firm up into a perfectly fudgy, chewy consistency. Do not overbake. A pan that looks completely done in the oven will be dry and overdone once cooled. Pull it when the edges are definitively golden and the center still has a slight wobble when you gently shake the pan. For more guidance on baking time and texture issues, our cookie troubleshooting guide covers the most common bar-baking problems with practical solutions.
Step 5 — Cool Completely Before Cutting

This is the most important and most frequently skipped step: cool the bars completely before cutting — at least 1 hour at room temperature, or 30 minutes in the refrigerator. Cutting warm cookie bars produces crumbled, messy, uneven slices. Cutting fully cooled bars produces clean, neat squares that hold their shape beautifully and look genuinely impressive. Use the parchment overhang to lift the entire slab onto a cutting board, then slice into bars with a sharp chef’s knife, wiping the blade between cuts for the cleanest results.
Five Cookie Bar Variations the Whole Family Will Love
Once you have the master recipe down, cookie bars become an endlessly customizable format. Here are five family-tested variations that all use the same base recipe with different mix-ins and toppings.
M&M Rainbow Cookie Bars
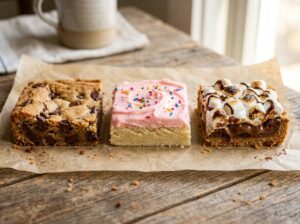
Replace the chocolate chips with 2 cups of M&Ms — or use 1 cup of each for a bar that has both gooey chocolate pockets and candy-coated bursts of color. Press extra M&Ms onto the surface before baking for a vibrant, confetti-like top that children find absolutely irresistible. These are particularly popular for birthday parties, classroom treats, and any occasion where a cookie needs to make a visual statement the moment it comes out of the pan.
Frosted Sugar Cookie Bars
Replace the brown sugar with all granulated white sugar, reduce the chocolate chips to zero, and add an extra teaspoon of vanilla plus ½ teaspoon of almond extract for a classic sugar cookie flavor in bar form. Once baked and cooled, frost with a simple cream cheese buttercream — 4 ounces of cream cheese beaten with 1 cup of powdered sugar, 2 tablespoons of softened butter, and a splash of vanilla — and top with rainbow sprinkles. These frosted sugar cookie bars are one of the most popular cookie formats of 2026 and are far simpler to make than decorated cut-out cookies while delivering the same festive impact.
S’mores Cookie Bars
Press half the cookie bar dough into the pan, scatter 1 cup of mini marshmallows and 1 cup of chopped dark chocolate over the top, then press the remaining dough over the filling as evenly as possible. The marshmallows melt into gooey pockets and the chocolate creates pools of richness throughout. Top with a few extra marshmallows and chocolate pieces before baking for a campfire-inspired result that is spectacular when served slightly warm. For families who loved our brookies recipe, s’mores cookie bars are the natural next adventure in layered pan baking.
Peanut Butter Chocolate Chip Cookie Bars
Replace ½ cup of the butter with ½ cup of smooth peanut butter — natural peanut butter, well stirred — and reduce the flour by 2 tablespoons. The peanut butter enriches the dough with a deep, nutty flavor that pairs with the chocolate chips in the most classic and crowd-pleasing way imaginable. Drizzle additional peanut butter over the top of the warm bars straight from the oven for a glistening, flavor-packed finish that looks bakery-worthy with zero additional effort.
Brown Butter Toffee Cookie Bars
Brown the butter before using it in the recipe — follow the technique we covered in detail in our post on brown butter cookies — and replace the chocolate chips with 1½ cups of toffee bits and ½ cup of semi-sweet chocolate chips. The combination of brown butter, toffee, and chocolate in bar form is genuinely extraordinary — warm, caramelized, deeply complex, and the kind of result that makes adults close their eyes for a moment after the first bite. These are the cookie bars for when you want to impress absolutely everyone at the table.
Expert Tips for Perfect Cookie Bars Every Time
Use the Right Pan Size
Pan size matters significantly in bar baking. A 9×13-inch pan produces bars with a good balance of edge-to-center ratio — plenty of those coveted crispy edges alongside a generous, thick, fudgy center. A smaller 8×8-inch or 9×9-inch pan produces thicker, fudgier bars with proportionally less edge — perfect for families who prefer maximum chewiness. Adjust your baking time accordingly: an 8×8 pan will need 5 to 8 additional minutes. A larger sheet pan produces thinner, crispier bars with more edge per bite — ideal for those who love a snap rather than a chew.
Line the Pan With Parchment — Every Time
Parchment paper with overhanging sides is non-negotiable for cookie bars. It prevents sticking completely, makes removal effortless, and allows you to cut the bars on a flat cutting board rather than trying to wrestle individual squares out of the pan with a spatula. Cut two strips of parchment to create a cross pattern in the pan — this gives you overhang on all four sides and the cleanest possible lift-out every time.
Refrigerate for the Cleanest Cuts
For truly clean, bakery-neat bar slices, refrigerate the fully cooled slab for 30 minutes before cutting. The cold firms up the butter and chocolate in the bars, making the dough easier to slice without compression or tearing. This is particularly helpful for bars with soft fillings like caramel or peanut butter, which can smear at room temperature. A sharp chef’s knife, cleaned between cuts, produces the cleanest results.
Store and Freeze Like a Pro
Cookie bars store beautifully at room temperature in an airtight container for up to 5 days. Layer them between sheets of parchment to prevent sticking. They freeze individually wrapped for up to 3 months — wrap each bar in plastic wrap, then store in a freezer bag. Thaw at room temperature for 20 minutes or microwave for 15 seconds. Uncut baked slabs also freeze well — wrap the entire cooled slab tightly in plastic wrap and then aluminum foil, freeze for up to 3 months, and thaw overnight in the refrigerator before cutting. For a complete guide to every storage and freezing method, see our ultimate cookie storage and freezing guide.
The One Baking Format Every Busy Family Needs
Cookie bars are not a shortcut. They are a smarter, more family-friendly version of the cookie experience — one that respects your time, involves your children at every stage, produces a genuinely impressive result, and cleans up in minutes. They are the format to reach for on school nights when the cookie craving is real but the energy is limited. They are the dessert to bring to a potluck when you want to show up with something homemade and spectacular without spending an afternoon at the stove. They are the baking project that always works, always satisfies, and always earns the question: “can we make these again tomorrow?”
Start with the classic chocolate chip version. Then try the M&M rainbow bars with your youngest helpers. Work your way toward the brown butter toffee version when you want to truly impress. And whenever you are looking for more simple, satisfying family baking inspiration, our collection of fun and easy cookie recipes for kids is always full of ideas for your next kitchen adventure together.
Happy baking from all of us at Mommy and Me Cookies! 🍪